Display Image
In this tutorial, we learn how to get image data from device with ion-kit, and display with OpenCV.
Prerequisite
- ionpy
- numpy
- OpenCV
pip3 install -U pip
pip3 install opencv-python
pip3 install numpy
pip3 install ion-python==1.8.10
Tutorial
Get Device Information
To display image with ionpy, we need to get the following information of the device.
- Width
- Height
- PixelFormat
The previous tutorial or arv-tool-0.8 will help to get these values.
Build a pipeline
First of all, we load the module of ionpy, which is a python-binding of ion-kit.
from ionpy import Node, Builder, Buffer, PortMap, Port, Param, Type, TypeCode
For Python users, you may have no C/C++ runtime library. If you have trouble to load the module of ionpy, you can install the library from the article of Microsoft official webpage.
As we learned in the introduction, we will build and execute pipeline for image I/O and processing.
In this tutorial, we build a very simple pipeline has only one Building Block that obtain image from U3V camera.
The following ionpy API set up our pipeline.
# pipeline setup
builder = Builder()
builder.set_target('host')
builder.with_bb_module('ion-bb')
The set_target specifies on what hardware the pipeline built by the Builder will run.
Since we woule like to use BB defined in ion-bb.dll, we need to load the module by with_bb_module function.
The BB we are going use for obtaining image data is image_io_u3v_cameraN_u8x2, which is designed for U3V camera that has 8-bit depth for each pixel data and 2 dimension; e.g. Mono8.
With the device pixelformat Mono10 or Mono12, you need image_io_u3v_cameraN_u16x2 since 16-bit depth pixel is required to store 10-bit and 12-bit pixel data respectively.
If the pixelformat is RGB8, it means bit depth is 8 and dimension is 3 (in addition to width and height, it has color channel) so you would use image_io_u3v_cameraN_u8x3.
| Name of the BB | Bit depth | Dimension | Example of PixelFormat |
|---|---|---|---|
image_io_u3v_cameraN_u8x2 | 8 | 2 | Mono8 |
image_io_u3v_cameraN_u8x3 | 8 | 3 | RGB8, BGR8 |
image_io_u3v_cameraN_u16x2 | 16 | 2 | Mono10, Mono12 |
To set static input values to set on BB, you need to define Param as follows.
# set params
num_devices = Param('num_devices', str(num_device))
frame_sync = Param('frame_sync', 'true')
realtime_display_mode = Param('realtime_display_mode', 'true')
| Key of Param | Value Type | Description |
|---|---|---|
num_devices | Integer | The number of devices to use in the program |
frame_sync | Boolean | If number of device is more than 1, sync the framecounts between devices |
realtime_display_mode | Boolean | Allows framedrop, but no delay |
Now, you add BB to your pipeline as node with ports and params.
# add a node to pipeline
node = builder.add(bb_name)\
    .set_param([num_devices, frame_sync, realtime_display_mode, ])
output_p = node.get_port('output')
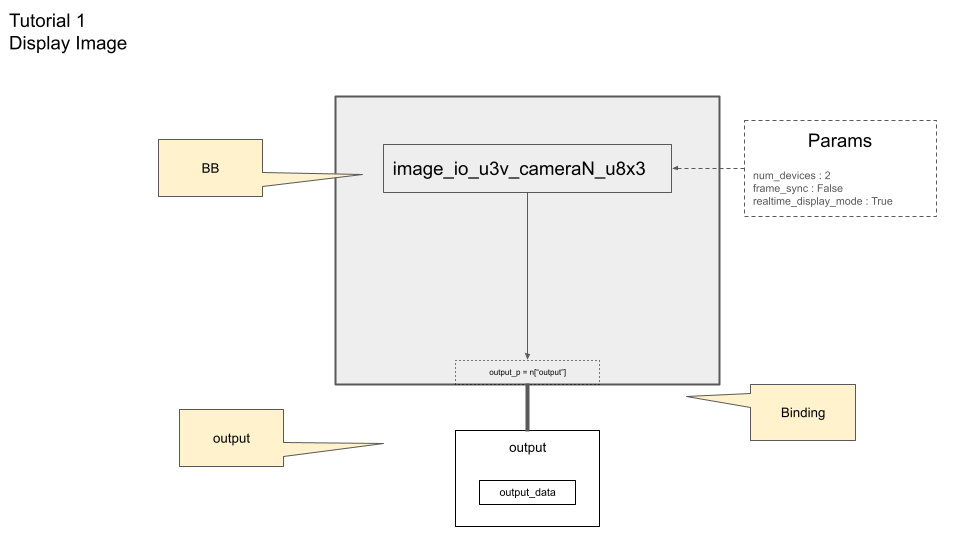
Since this is the only one BB in our pipeline, output port of the node can be the output port of the pipeline, and we name is output_p.
Our pipeline with BB and port looks like this:

To get the output data from port, we prepare the buffers and bind a port to buffer for output.
# create halide buffer for output port
output_size = (height, width, )
if pixelformat == "RGB8":
    output_size += (3,)
output_data = np.full(output_size, fill_value=0, dtype=data_type)
output = []
output.append(Buffer(array= output_data))

# set I/O ports
output_p.bind(output)
Note that output_size here is designed for 2D image. If the pixel format is RGB8, you need to set (width, height, 3) to add color channel.
Execute the pipeline
The pipeline is ready to run. Each time you call run(), the buffer output receive output images.
builder.run()
Display with OpenCV
While our output port is bound with Buffer output, output data (i.e. image data) is stored into numpy array (output_data).
OpenCV can treat numpy array, so you can use cv2.imshow("img", output_data) to display the output image.
However, if the pixelformat depth does not match the depth of the numpy array (e.g., Mono10 or Mono12), you may want to shift the data by a few bits; otherwise, the obtained image may appear much darker.
coef = pow(2, num_bit_shift)
output_data *= coef
cv2.imshow("img", output_data)
To obtain the sequential images, you can set while loop with cv2.waitKeyEx(1). This holds the program for 1 ms, and return non -1 value if there's any userinput. The following code infinitely loop unless a user types any key.
coef = pow(2, num_bit_shift)
user_input = -1

while(user_input == -1):
    # running the builder
    builder.run()
    output_data *= coef

    cv2.imshow("img", output_data)
    user_input = cv2.waitKeyEx(1)
Do not forget to destroy windows that displayed the image after while loop.
cv2.destroyAllWindows()
Now, you can run the script and will see the images that the device captured.
If your Linux desktop environment is GNOME, you may see the following warning. However, it does not affect your program's functionality or performance, so you can safely ignore it.
Warning: Ignoring XDG_SESSION_TYPE=wayland on Gnome. Use QT_QPA_PLATFORM=wayland to run on Wayland anyway.
or
qt.qpa.plugin: Could not find the Qt platform plugin "wayland" in "/home/<username>/.local/lib/python3.10/site-packages/cv2/qt/plugins"
Complete code
Complete code used in the tutorial is here.