Save Sensor Data (GenDC)
In this tutorial, we will learn how to save GenDC data transferred from a sensor into a binary file.
If your device data format is non-GenDC (general camera acquire images), see the next tutorial page Save Sensor Data (non-GenDC).
Prerequisite
- ion-kit (installed with sensing-dev SDK)
Tutorial
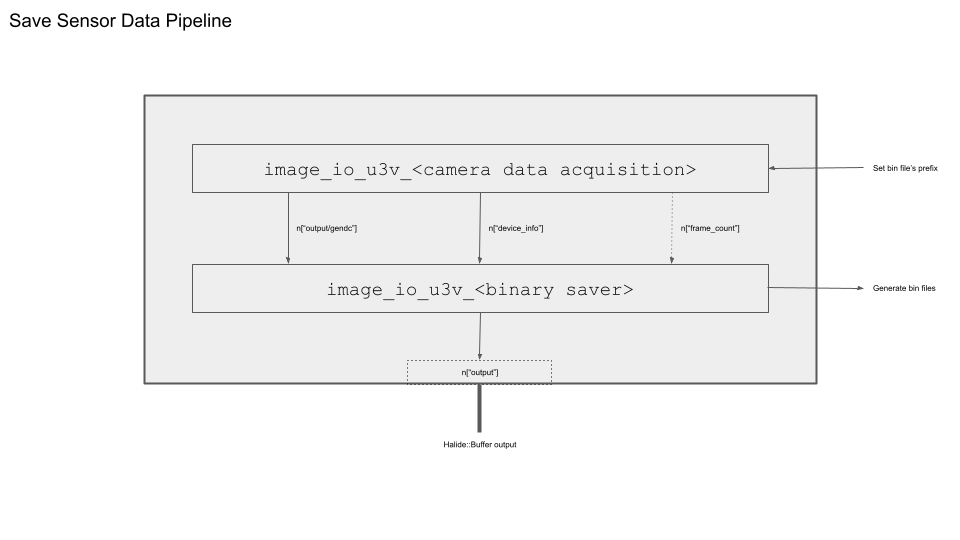
In previous tutorials, we utilized a single building block (BB) in a pipeline to acquire sensor data. Now, we're incorporating the binarysaver BB to enable a two-step flow: 1. Acquiring data, and 2. Saving data within the pipeline.

Build a pipeline
The process of initializing the pipeline Builder is exactly the same as in the previous tutorials.
// pipeline setup
Builder b;
b.set_target(ion::get_host_target());
b.with_bb_module("ion-bb");
As the succeeding building block (BB) after the sensor data acquisition BB, we connect the binarysaver BB to establish the flow: 1. Acquire data, then 2. Save data in the pipeline.
The specific building block (BB) utilized depends on the type of sensor data being used. In this tutorial, we present an example demonstrating how to save GenDC data. If your device data format is non-GenDC (general camera acquire images), see the next tutorial page Save Sensor Data (non-GenDC).
| Data Acquisition BB | Binary saver BB | |
|---|---|---|
| GenDC | image_io_u3v_gendc | image_io_u3v_binary_gendc_saver |
We are now adding two BBs to our pipeline b. The second BB, image_io_u3v_binary_gendc_saver, requires three inputs for its ports: GenDC data, Device Information, and PayloadSize.
// add the first BB to acquire data
Node n = b.add("image_io_u3v_gendc")();
// add the second BB to save binary data
n = b.add("image_io_binary_gendc_saver")(n["gendc"], n["device_info"], &payloadsize);
The GenDC data and Device Information are obtained by the acquisition BB in the previous node, image_io_u3v_gendc. The PayloadSize represents the entire size of the GenDC container, which can be retrieved using the command arv-tool-0.8 -n <device name> control PayloadSize in the console. For detailed usage instructions, please refer to arv-tool-0.8.
For multi-sensor data
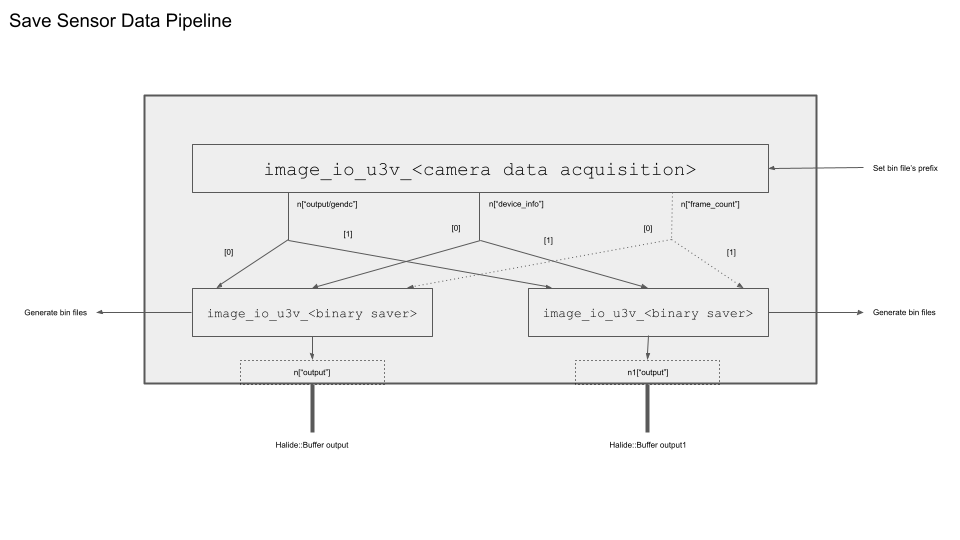
If you acquire data from more than one sensor in the first BB using Param("num_devices", 2), you must save them separately using individual binary saver BBs. Otherwise, the data from one sensor will overwrite the data from the other.

To access the output data from each sensor in the first BB, you can use indexing [] as follows. Ensure that you set Param("prefix", "gendc0-") and Param("prefix", "gendc1-") for each binary saver BB to prevent them from overwriting each other's content.
Node n = b.add("image_io_u3v_gendc")().set_param(Param("num_devices", 2),);

if (num_device == 2){
    int32_t payloadsize1 = payloadsize[1];
    Node n1 = b.add("image_io_binary_gendc_saver")(n["gendc"][1], n["device_info"][1], &payloadsize1)
   .set_param(
       Param("prefix", "gendc1-"),
       Param("output_directory", saving_diretctory)
   );
   n1["output"].bind(outputs[1]);
}

int32_t payloadsize0 = payloadsize[0];
n = b.add("image_io_binary_gendc_saver")(n["gendc"][0], n["device_info"][0], &payloadsize0)
   .set_param(
       Param("prefix", "gendc0-"),
       Param("output_directory", saving_diretctory)
   );
n["output"].bind(outputs[0]);
If we have multiple devices, make sure that each payloadsize matches:
# bind input values to the input port
std::vector<int32_t> payloadsize = {2074880, 2074880};
int32_t payloadsize0 = payloadsize[0];
...
n = b.add("image_io_binary_gendc_saver")(n["gendc"][0], n["device_info"][0], &payloadsize0)
...
Set output port
The binary file will be saved within the binary saver BB process, while we obtain a scalar output from the pipeline.
This is merely a terminal flag to indicate whether the BB successfully saved the data or not, so the specific value inside may not be of concern. We simply need to create an output buffer to receive it.
Halide::Buffer<int> output = Halide::Buffer<int>::make_scalar();
n["output"].bind(output);
Execute the pipeline
Execute builder.run() to finish the pipeline as usual.
By default, the binary data will be saved in the following format: <output directory>/<prefix>0.bin, <output directory>/<prefix>1.bin, <output directory>/<prefix>2.bin, and so forth. The default output directory is the current directory, and the default prefix is raw-. To customize these values, please utilize the Param within the binary saver BB.
Complete code
Complete code used in the tutorial is here.