Display Image
In this tutorial, we learn how to get image data from device with ion-kit, and display with OpenCV.
Prerequisite
- OpenCV (installed with sensing-dev SDK with
-InstallOpenCVoption) - ion-kit (installed with sensing-dev SDK)
Tutorial
Get Device Information
To display image with ionpy, we need to get the following information of the device.
- Width
- Height
- PixelFormat
The previous tutorial or arv-tool-0.8 will help to get these values.
Build a pipeline
As we learned in the introduction, we will build and execute pipeline for image I/O and processing.
To use API of ion-kit and OpenCV, we need to include the header:
#include <ion/ion.h>

#include <opencv2/core.hpp>
#include <opencv2/imgproc.hpp>
#include <opencv2/highgui.hpp>
In this tutorial, we build a very simple pipeline has only one Building Block that obtain image from U3V camera.
The following ion API set up our pipeline.
// pipeline setup
Builder b;
b.set_target(ion::get_host_target());
b.with_bb_module("ion-bb");
The set_target specifies on what hardware the pipeline built by the Builder will run.
Since we woule like to use BB defined in ion-bb.dll, we need to load the module by with_bb_module function.
The BB we are going use for obtaining image data is image_io_u3v_cameraN_u8x2, which is designed for U3V camera that has 8-bit depth for each pixel data and 2 dimension; e.g. Mono8.
With the device pixelformat Mono10 or Mono12, you need image_io_u3v_cameraN_u16x2 since 16-bit depth pixel is required to store 10-bit and 12-bit pixel data respectively.
If the pixelformat is RGB8, it means bit depth is 8 and dimension is 3 (in addition to width and height, it has color channel) so you would use image_io_u3v_cameraN_u8x3.
| Name of the BB | Bit depth | Dimension | Example of PixelFormat |
|---|---|---|---|
image_io_u3v_cameraN_u8x2 | 8 | 2 | Mono8 |
image_io_u3v_cameraN_u8x3 | 8 | 3 | RGB8, BGR8 |
image_io_u3v_cameraN_u16x2 | 16 | 2 | Mono10, Mono12 |
To set static input values to set on BB, you need to define Param as follows.
// set params
Param num_devices("num_devices", num_device),
Param frame_sync("frame_sync", true),
Param realtime_display_mode("realtime_display_mode", true)
| Key of Param | Value Type | Description |
|---|---|---|
num_devices | Integer | The number of devices to use in the program |
frame_sync | Boolean | If number of device is more than 1, sync the framecounts between devices |
realtime_display_mode | Boolean | Allows framedrop, but no delay |
Now, you add BB to your pipeline as node with ports and params.
Node n = b.add(bb_name)()
    .set_param(
        Param("num_devices", num_device),
        Param("frame_sync", true),
        Param("realtime_display_mode", false)
    );
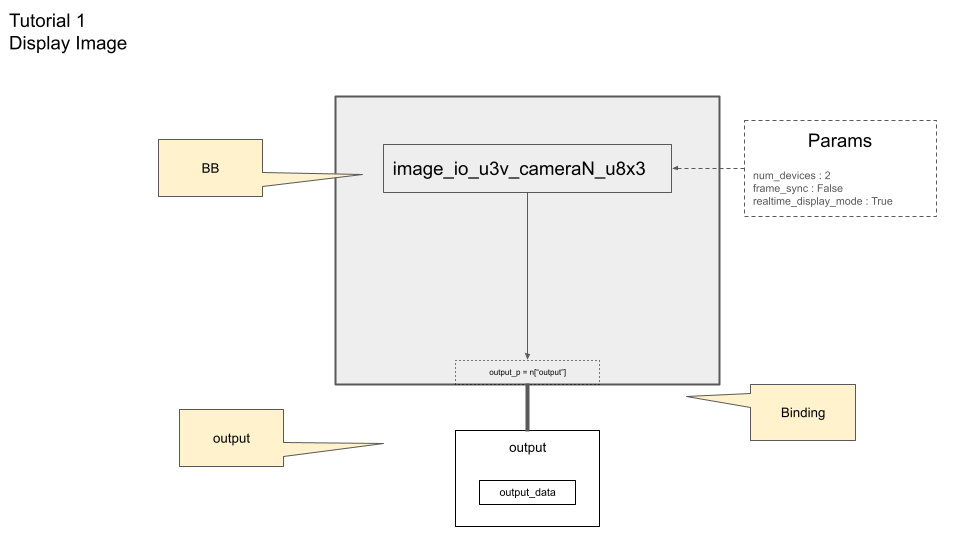
Since this is the only one BB in our pipeline, output port of the node can be the output port of the pipeline, n["output"].
Our pipeline with BB and port looks like this:

To get the output data from port, we prepare the buffers and bind a port to buffer for output.
// portmapping from output port to output buffer
std::vector< int > buf_size = std::vector < int >{ width, height };
if (pixel_format == "RGB8"){
    buf_size.push_back(3);
}
std::vector<Halide::Buffer<T>> output;
for (int i = 0; i < num_device; ++i){
    output.push_back(Halide::Buffer<T>(buf_size));
}
n["output"].bind(output);
Note that buf_size here is designed for 2D image. If the pixel format is RGB8, you need to set (width, height, 3) to add color channel.
T is the type of the output buffer; e.g. uint8_t for Mono8 and RGB8 while uint16_t for Mono10 and Mono12.
Execute the pipeline
The pipeline is ready to run. Each time you call run(), the buffer in the vector or output receive output images.
b.run();
Display with OpenCV
Since our output data (i.e. image data) is binded with the vector of Buffer output, we can copy this to OpenCV buffer to image process or display.
Note that OpenCV has different order of channel (dimension) on their buffer.
int coef =  positive_pow(2, num_bit_shift_map[pixel_format]);

// for ith device
cv::Mat img(height, width, opencv_mat_type[pixel_format]);
std::memcpy(img.ptr(), output[i].data(), output[i].size_in_bytes());
img *= coef;
opencv_mat_type[pixel_format] depends on PixelFormat (the bit-depth and dimension) of image data; e.g. CV_8UC1 for Mono8, CV_8UC3 for RGB8 while CV_16UC1 for Mono10 and Mono12.
We can copy output[i] to the OpenCV Mat object to display.
cv::imshow("image" + std::to_string(i), img);
user_input = cv::waitKeyEx(1);
Note that output is the vector of Buffer (so that you many set num_device more than 1 to control multiple devices), you access outpus[0] to get image data.
To obtain the sequential images, you can set while loop with cv::waitKeyEx(1). This holds the program for 1 ms, and return non -1 value if there's any userinput. The following code infinitely loop unless a user types any key.
while(user_input == -1)
{
    // JIT compilation and execution of pipelines with Builder.
    b.run();

    // Convert the retrieved buffer object to OpenCV buffer format.
    for (int i = 0; i < num_device; ++i){
    cv::Mat img(height, width, opencv_mat_type[pixel_format]);
    std::memcpy(img.ptr(), output[i].data(), output[i].size_in_bytes());
    img *= coef;
    cv::imshow("image" + std::to_string(i), img);
    }

    // Wait for 1ms
    user_input = cv::waitKeyEx(1);
}
Complete code
Complete code used in the tutorial is here.
- If you are using OpenCV that you install by yourself, please confirm that it is linked to your program appropriately.