Installation - Windows
This document describes the steps to install the software development environment for U3V camera on Windows.
Content (Click to jump)
- SDK Installation
- C++ User
- Install procedure
- Set environment variables
- Uninstall procedure
- Python User
- Install procedure
- Uninstall procedure
- C++ User
- WinUSB installation
C++ User
Prerequisite
- OS: Windows 10/11, 64 bit version
- Development environment
- C++: Visual Studio 2019/2022 (17.09 or earlier)
- Hardware:
- USB3.0 compatible USB port x2
- Runtime dependencies
If you are using MSVC 2022 (17.10 or later), install OpenCV 4.10.0 or later from the officieal website.
Do not forget to add the directory containing the DLL library to the PATH environment variable. See the detail in Update OpenCV.
Sensing-dev Software Packages
Please DL the installer script above or here.
Open the powershell terminal and move to the directory where you have the installer script downloaded in the previous step.
Then type the following command.
.\installer.ps1
If you do not have and need OpenCV, you can add -InstallOpenCV option.
If you also need Gstreamer tools and plugins, add -InstallGstTools and -InstallGstPlugins respectively
The following example allows you to install all optional components with Sensing-Dev SDK.
.\installer.ps1 -InstallOpenCV -InstallGstTools -InstallGstPlugins
-InstallOpenCV: Add this option to install OpenCV with Sensing-Dev SDK.-InstallGstTools: Add this option to install Gstreamer tools with Sensing-Dev SDK.-InstallGstPlugins: Add this option to install Gstreamer plugins with Sensing-Dev SDK.
The default installation path would be "C:\Users\<username>\AppData\Local\sensing-dev".
When you get
installer.ps1 cannot be loaded because running scripts is disabled on this system
your powershell does not allow to run the script. If so, please add -ExecutionPolicy Bypass option as the following example:
powershell.exe -ExecutionPolicy Bypass -File installer.ps1
Set environment variables
Running the installer.ps1 script would automatically set the environment variable %PATH% and %SENSING_DEV_ROOT% which SDK requires, so you may skip this step.
However, if you change the default path or move the package location, it requires to set them manually with the procedure.
Uninstall procedure
Execute the following command on powershell console will delete the software package and envitronment variables set by installer.ps1.
Invoke-WebRequest -Uri https://github.com/Sensing-Dev/sensing-dev-installer/releases/download/v25.01.02/uninstaller.ps1 -OutFile uninstaller.ps1 -Verbose; powershell.exe -ExecutionPolicy Bypass -File ./uninstaller.ps1
Python User
Prerequisite
- OS: Windows 10/11, 64 bit version
- Development environment (One of them)
- Python >=3.10
- Hardware:
- USB3.0 compatible USB port x2
- Tools for installation
- Microsoft C++ Build Tools
- Windows SDK
- Winget (for Windows 10 users) via Microsoft Store
- Runtime dependencies
If you used Sensing-Dev python version v24.05 or eariler, run the following command to remove the old-version dependencies.
Invoke-WebRequest -Uri https://github.com/Sensing-Dev/sensing-dev-installer/releases/download/v25.01.02/uninstaller.ps1 -OutFile uninstaller.ps1 -Verbose; powershell.exe -ExecutionPolicy Bypass -File ./uninstaller.ps1
Also, v24.09 or later uses ion-contrib-python instead of ion-python. Therefore, please uninstall ion-python with the following command.
pip uninstall ion-python -y
To fully utilize Sensing-Dev SDK, we recommend to install C++ version too so that you can access to arv-tool which allows you to control Camera from console.
Install dependency
First of all, download from here to install PyGObject
Invoke-WebRequest -Uri https://github.com/Sensing-Dev/sensing-dev-installer/releases/download/v25.01.02/pygobject_installer.ps1 -OutFile pygobject_installer.ps1 -Verbose; powershell.exe -ExecutionPolicy Bypass -File ./pygobject_installer.ps1
Install Python Modules
Then install aravis-python and gendc-python and ion-contrib-python to fully utilize. It is optional to install opencv-python, which is required for some of tutorials.
pip3 install -U pip
pip3 install aravis-python==0.8.31.dev1
pip3 install ion-contrib-python==3.2.7
pip3 install gendc-python==0.4.1
pip3 install opencv-python
Uninstall Python Modules
When you want to uninstall the modules introduced by Sensing-Dev, please execute the following command.
pip3 uninstall aravis-python ion-contrib-python gendc-python PyGObject -y
Install WinUSB driver on U3V device.
This step is only required the first time a U3V camera device is connected to a host machine.
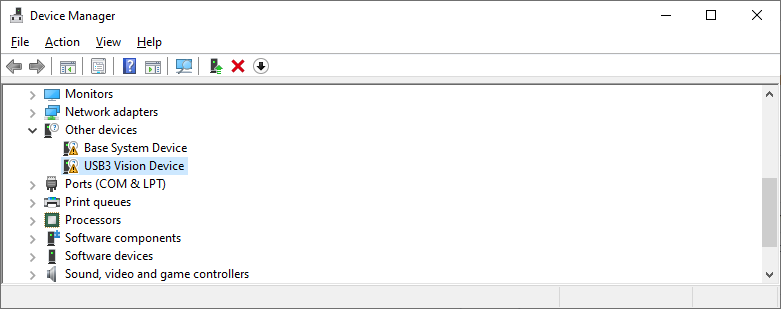
- To apply WinUSB to the target USB device, you need to know Vendor ID and Product ID of the device. Check your U3V camera device using Device Manager. In the search box on the taskbar, type device manager, then select Device Manager from the menu.

The image shows there are two unknown U3V camera devices connected on my host machine and we need to install the WinUSB driver.
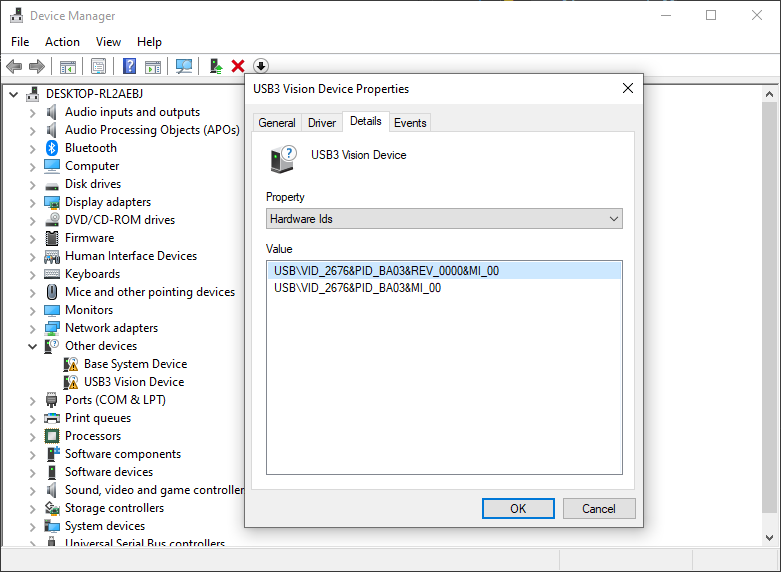
You now double-click the U3V camera device and select the Details tab on the pop up window.
From the dropdown menu, choose Hardware Ids and now you can see the Vendor ID in the box following VID_, and Product after PID_BA03.
In the example below, they are 2676 and BA03 respectively.

- Execute the following command on powershell console with Vendor ID that you checked in the step1. This process may take up to 5 minutes.
Invoke-WebRequest -Uri https://github.com/Sensing-Dev/WinUSB-installer-generator/releases/download/v24.02.02/generate_and_apply_WinUSB.ps1 -OutFile generate_and_apply_WinUSB.ps1 -Verbose; powershell.exe -ExecutionPolicy Bypass -File ./generate_and_apply_WinUSB.ps1 <Vendor ID> <Product ID>
When you replace <Vendor ID> and <Product ID> with their actual values, you do not need < and >.
- Example with some U3V camera devices
| <Vendor ID> | <Product ID> | |
|---|---|---|
| Basler daA1280-54uc | 2676 | BA03 |
| Sony Kizashi1.2 | 054C | 0D7D |
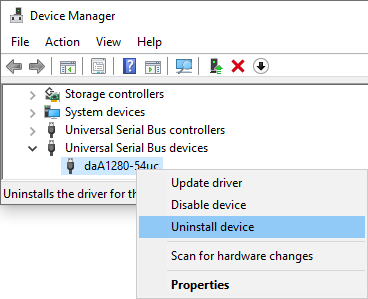
- Open Device Manager again, and right click on your device and choose uninstall device.

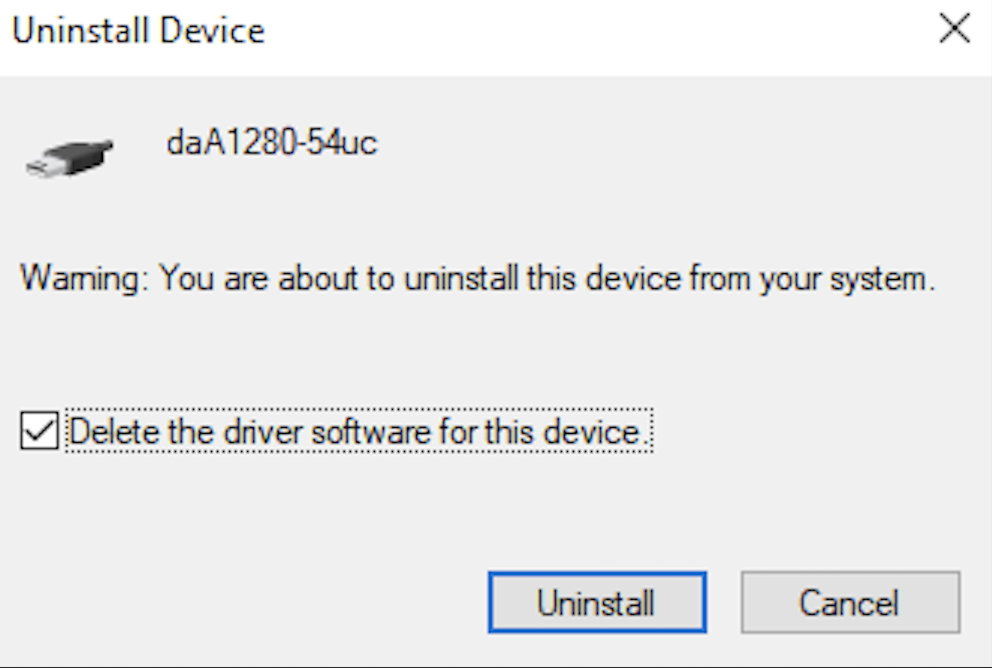
- Click the checkbox and click uninstall device

- Open Action and click scan for hardware changes

If your device is displaying as an unknown device, congratulations! The WinUSB driver has been successfully uninstalled!